Dreamscapes: The Sandman: Chapter Eight: The Endless Desert
Depend on our Dreamscapes: The Sandman Walkthrough to help you navigate the dark recesses of Laura's nightmare as you attempt to save her from the vile Sandman who has trapped her. Our beautifully marked screenshots, puzzle solutions, and detailed step-by-step instructions will help you locate the missing pieces of Laura's dreamcatcher and put an end to this night terror once and for all!
Chapter One: The Professor’s Laboratory
Chapter Two: The Ruined Church
Chapter Three: The Frozen Lake
Chapter Four: The Family Home
Chapter Five: The Corrupted Forest
Chapter Six: The Abandoned Theme Park
Chapter Seven: The Empty Square
Chapter Eight: The Endless Desert
Chapter Nine: The Ritual
Ask for help in the comments below!
With Laura’s real self in the hands of the Sandman and the dreamcatcher still missing several parts, time it seems, is not on our side. After releasing another of Laura’s copies from a public execution, we find ourselves once again in the long hallway. We need to move fast if we wish to save Laura from the clutches of the evil Sandman.
- The numbers on the images correspond to the instructions below.
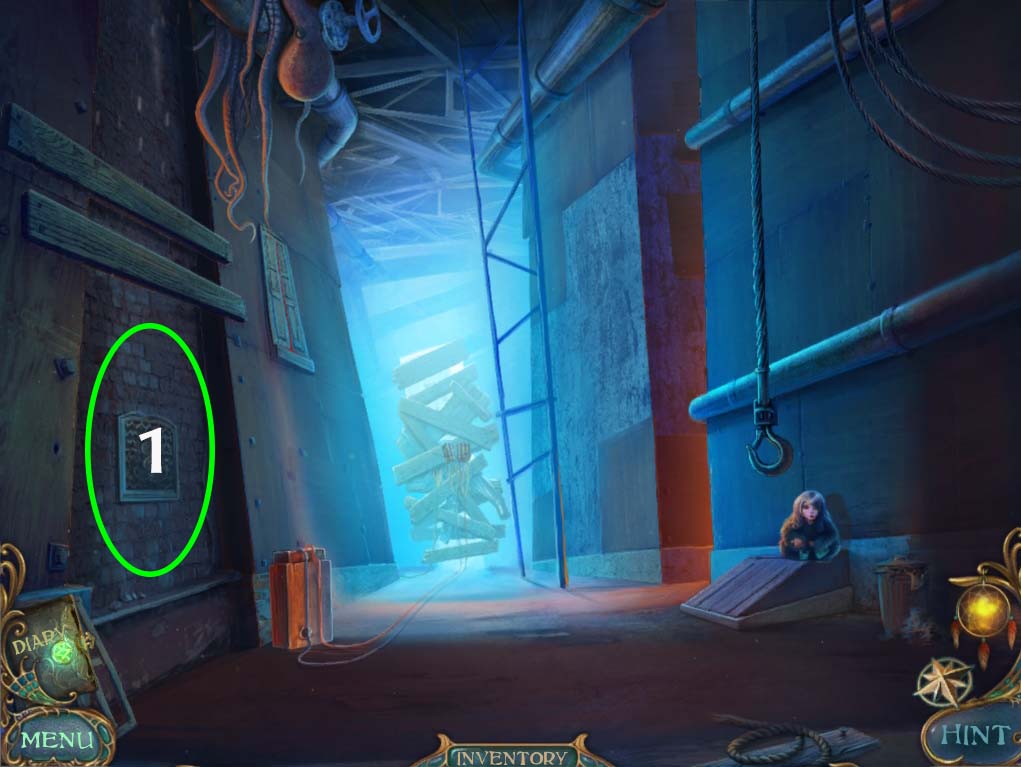
- 1. Investigate the area circled in green on the image above.
- You will see a panel where you can place the SERPENT symbol that you picked up earlier.
- Doing so will activate the BEAD PUZZLE
COLORED BEAD PUZZLE
The object of this puzzle is to arrange the colored beads so that they match the colors painted on the background. Clicking and dragging the beads will allow you to move them in any direction, provided of course that nothing is in their path. A step by step solution is detailed below:
Start
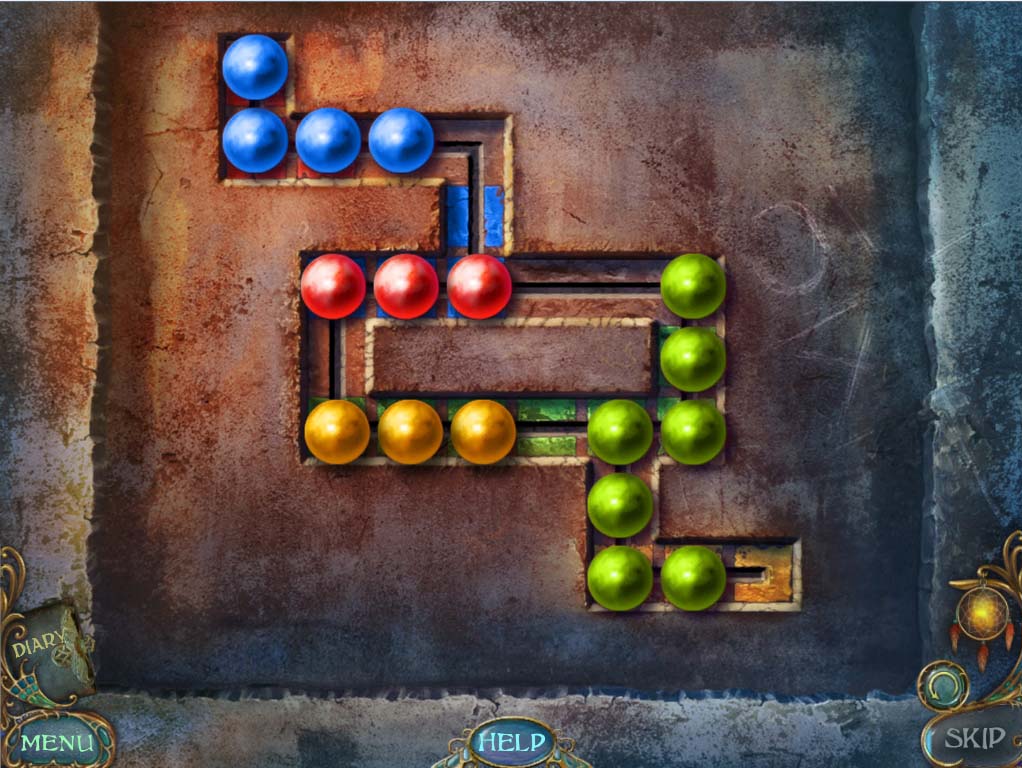
- Move the green beads as shown below and move both red and yellow beads to the right

- Move the blue beads down as shown below
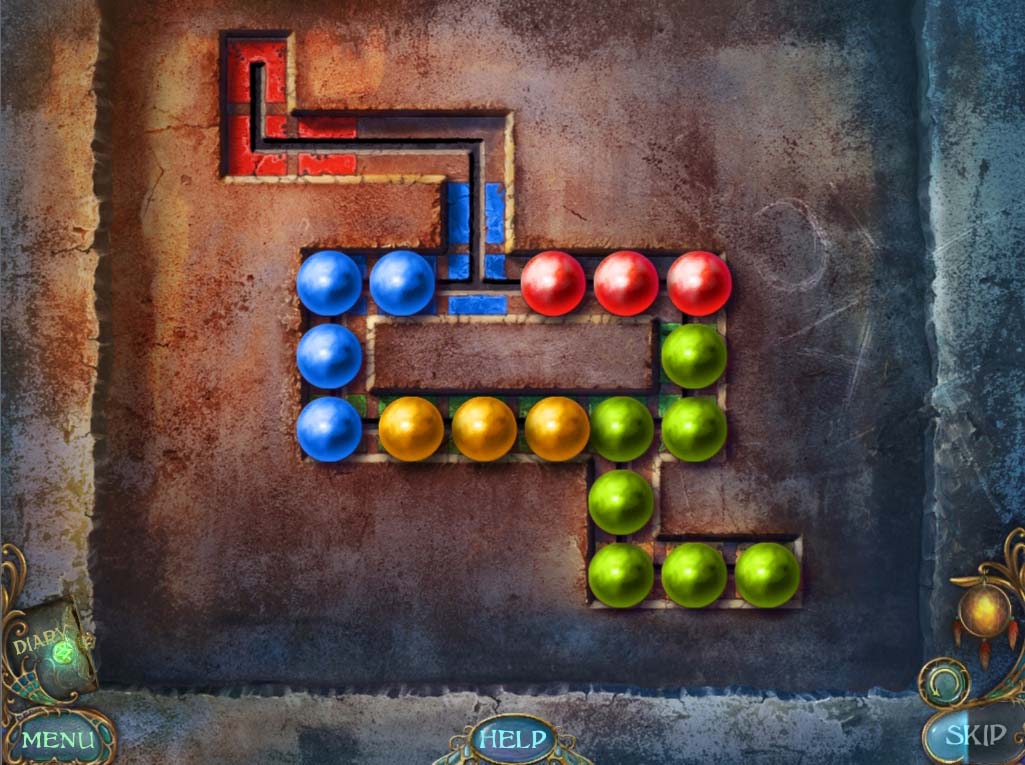
- Move the red beads to their proper position
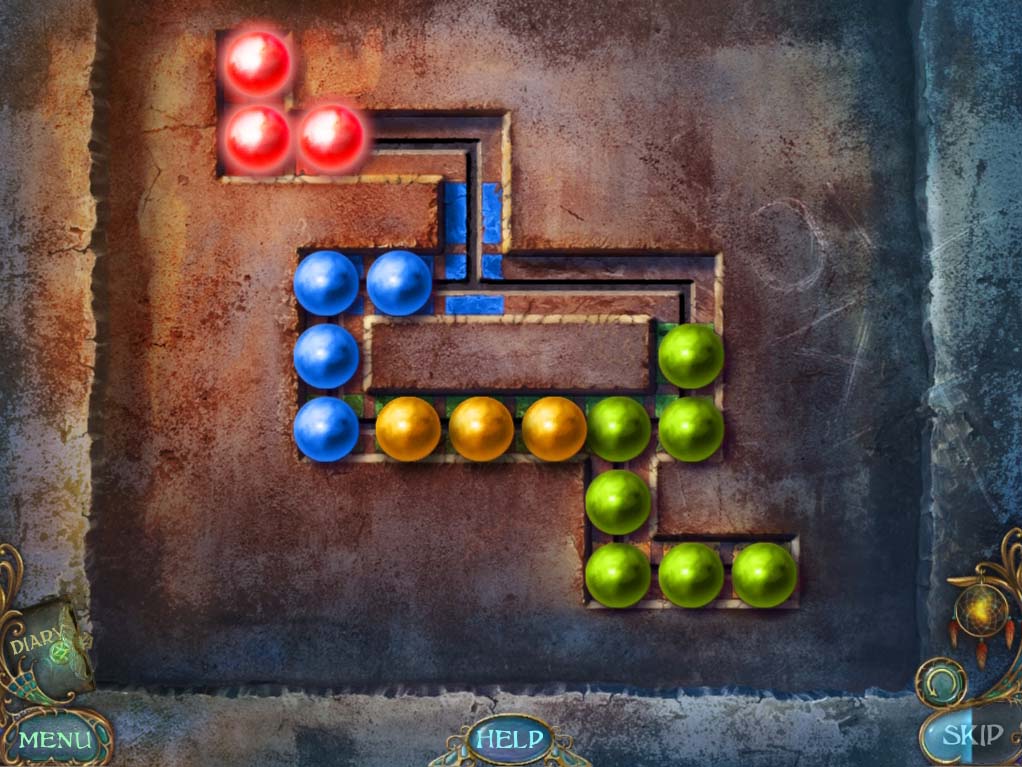
- Move the green beads up as shown below
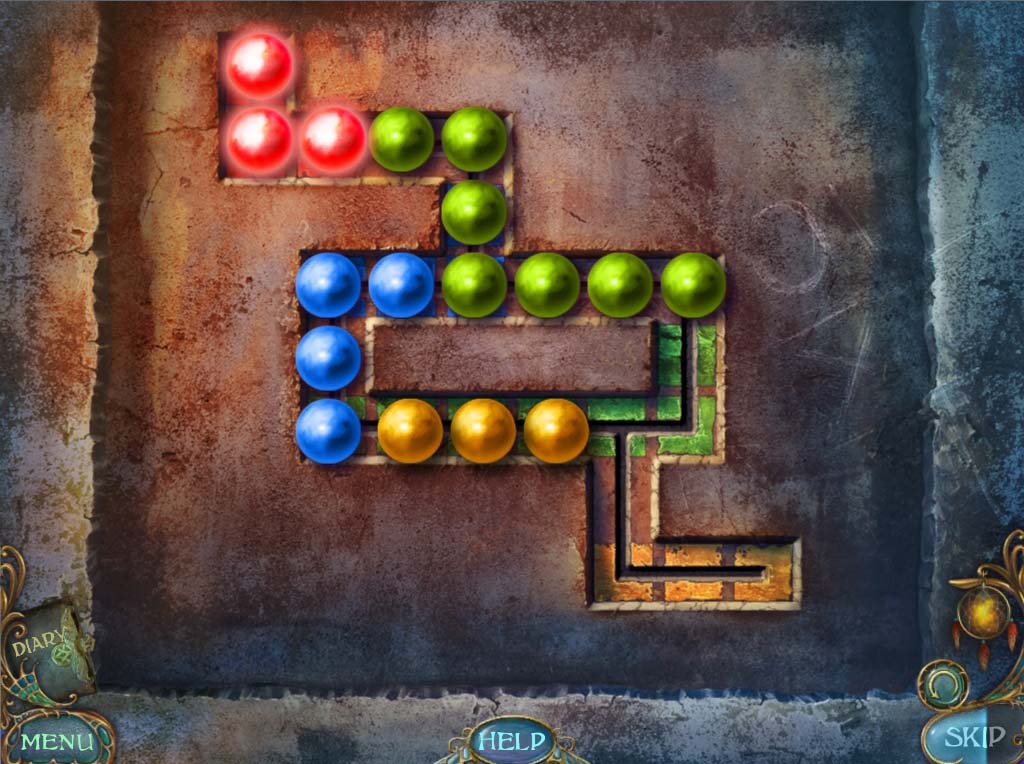
- Move the yellow beads to their proper position
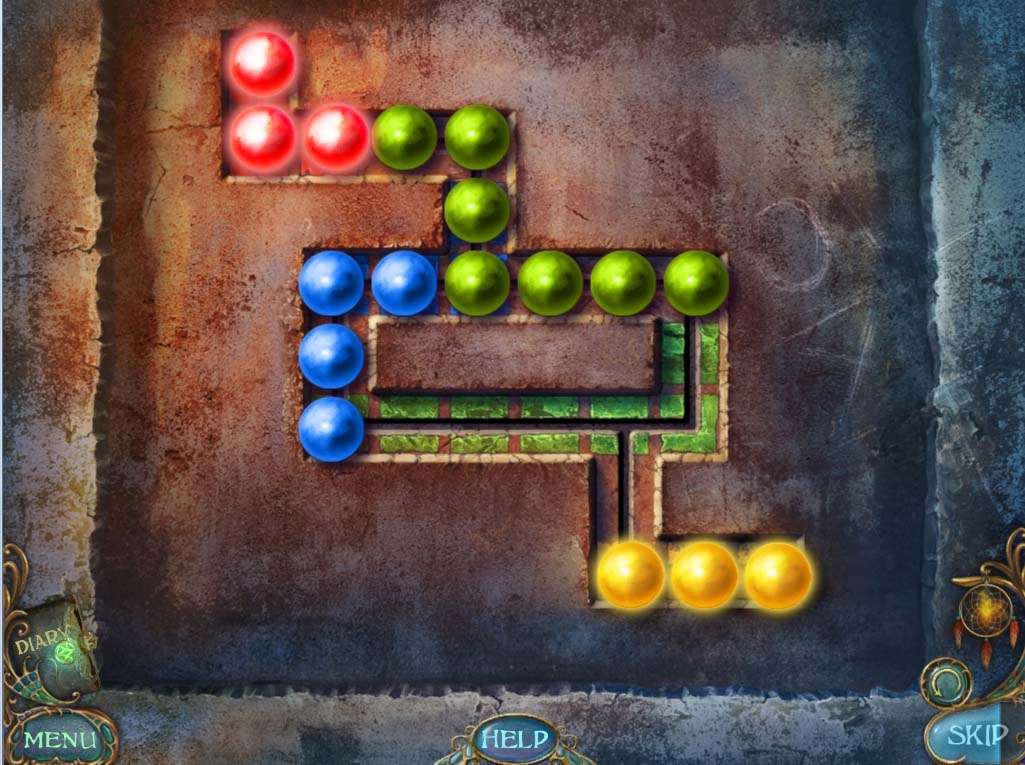
- Move the green beads down as shown below and move the blue beads to their proper position
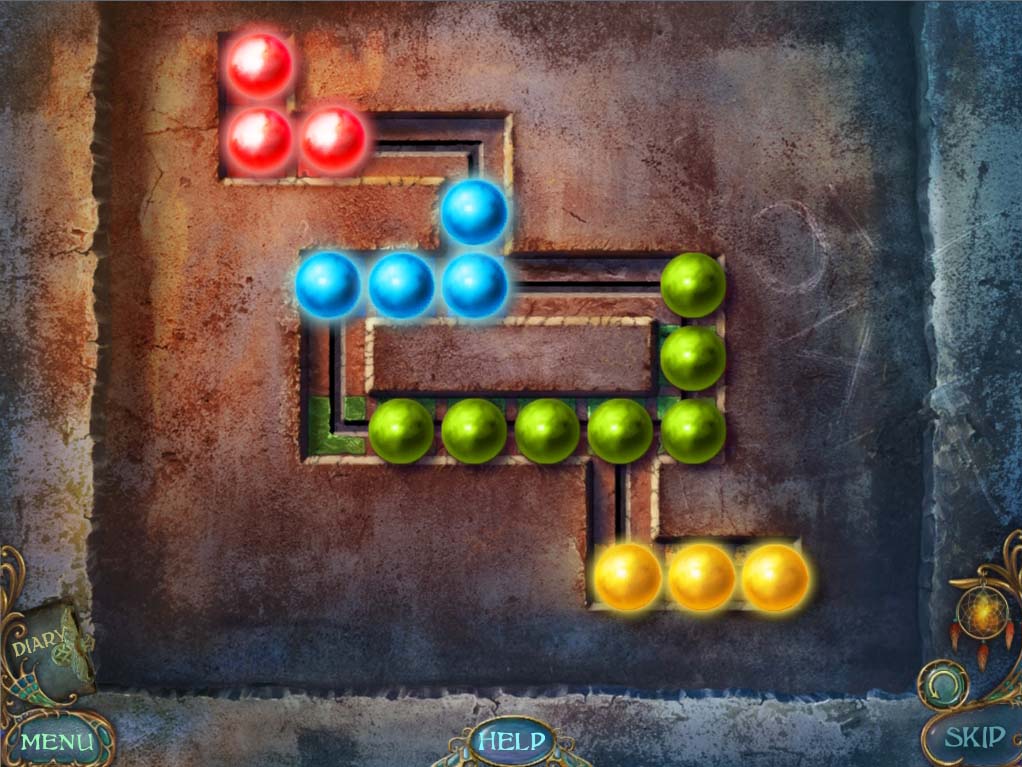
- Finish the puzzle by putting the green beads to their proper position
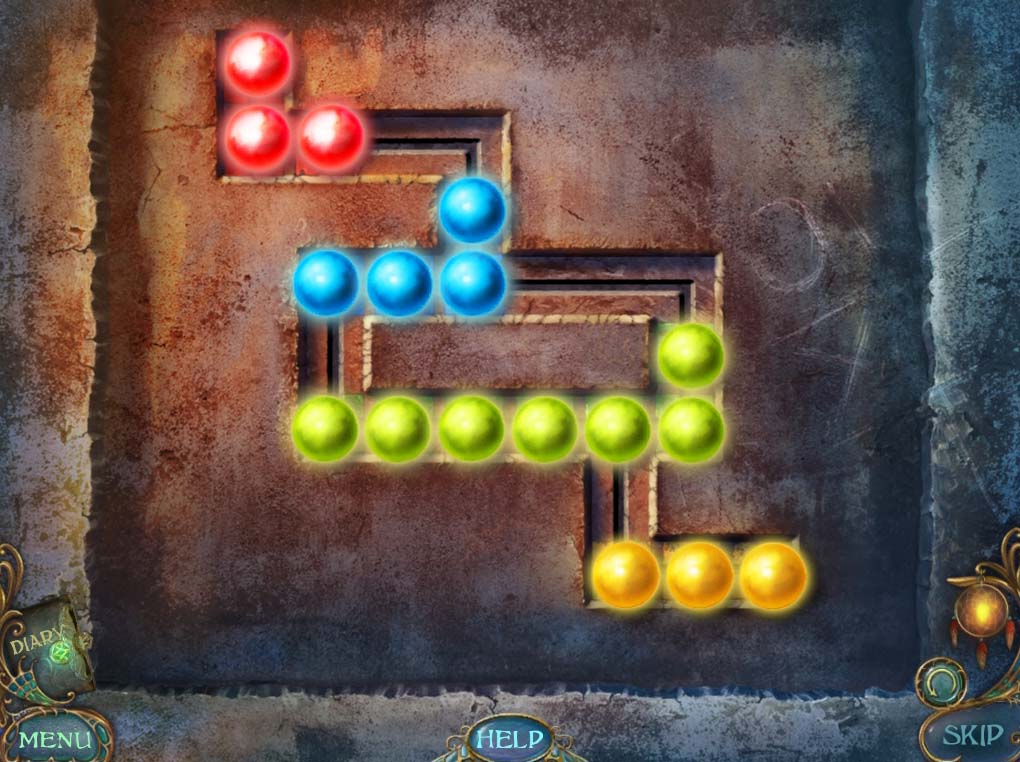
- Once the puzzle is solved, the wall will move back revealing another path.
- Go inside to start the cutscene and rescue the final separated part of Laura’s psyche.
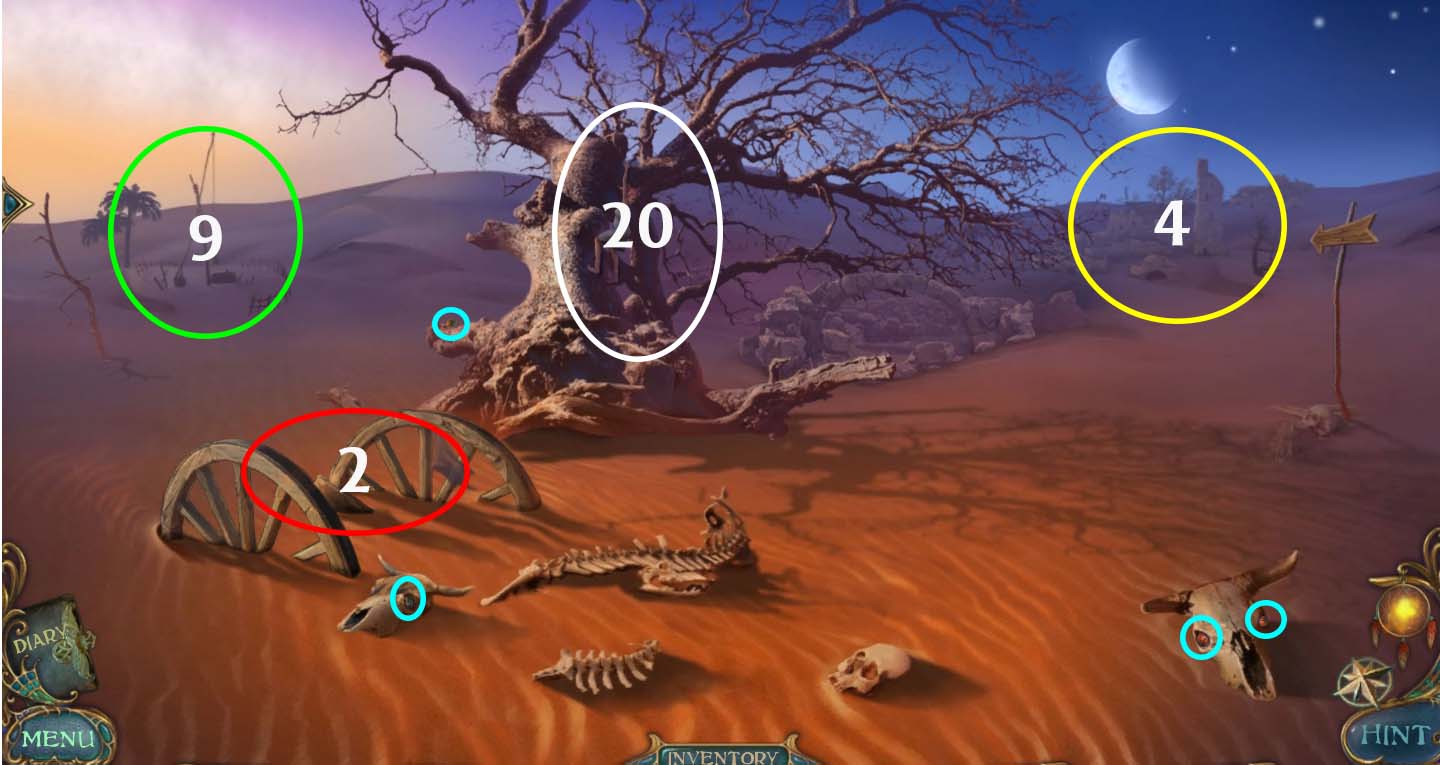
- Eliminate the BEHOLDERS in the area (circled in blue above) (4 of 5) / (95 of 110)
- 2. Investigate the broken wagon (circled in red in image above)
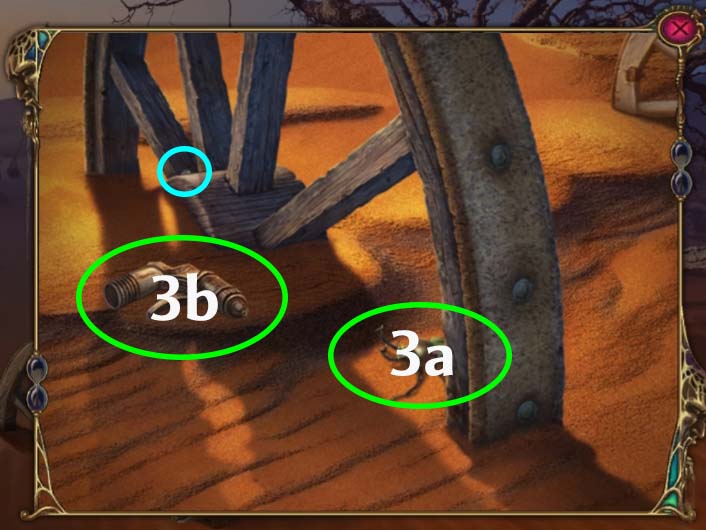
- Eliminate the BEHOLDER in the area (circled in blue above) (5 of 5) / (96 of 110)
- 3. Take the SPRAYER and the BEETLE (1 of 4) (both circled in green above)
- 4. Investigate the area circled in yellow on the DESERT image above
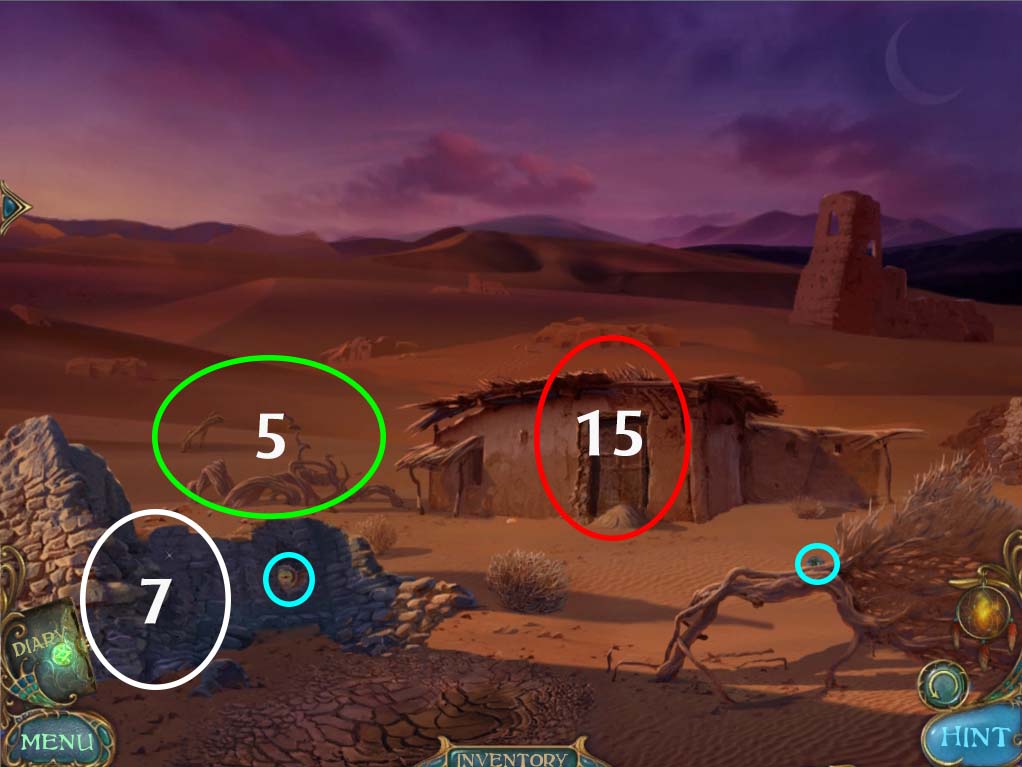
- Eliminate the BEHOLDERS in the area (circled in blue above) (2 of 6) / (98 of 110)
- 5. Investigate the DEAD TREE circled in green above
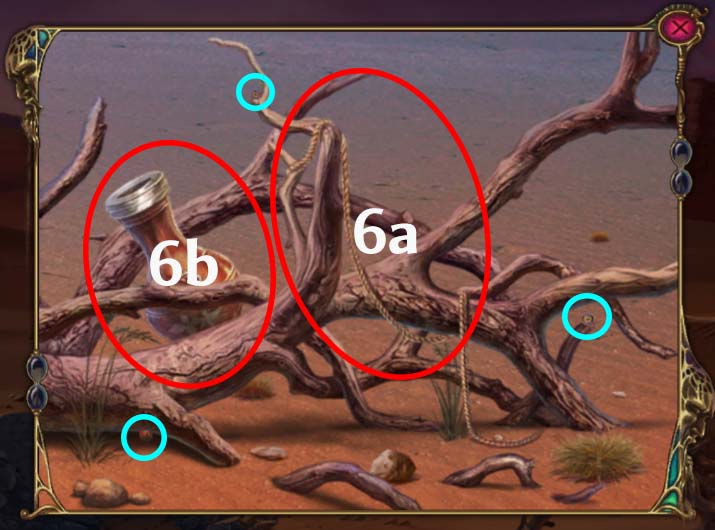
- Eliminate the BEHOLDERS in the area (circled in blue above) (5 of 6) / (101 of 110)
- 6. Take the FLASK and the ROPE (both circled in red on the image above)
- 7. Investigate the CRUMBLED WALL (circled in white in the ABANDONED HOUSE image above)
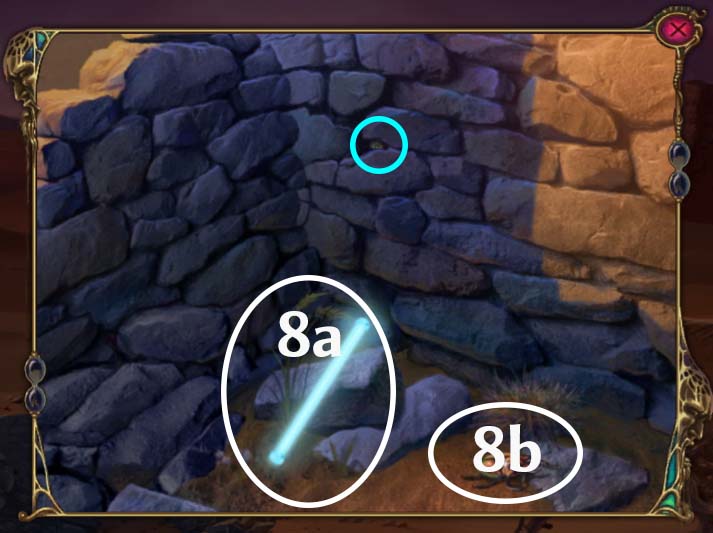
- Eliminate the BEHOLDER in the area (circled in blue above) (6 of 6) / (102 of 110)
- 8. Take both the BEETLE (2 of 4) and the GLOWSTICK for your inventory (both circled in white above)
- 9. Return to the DESERT area and investigate the WELL (circled in green on the DESERT image above).
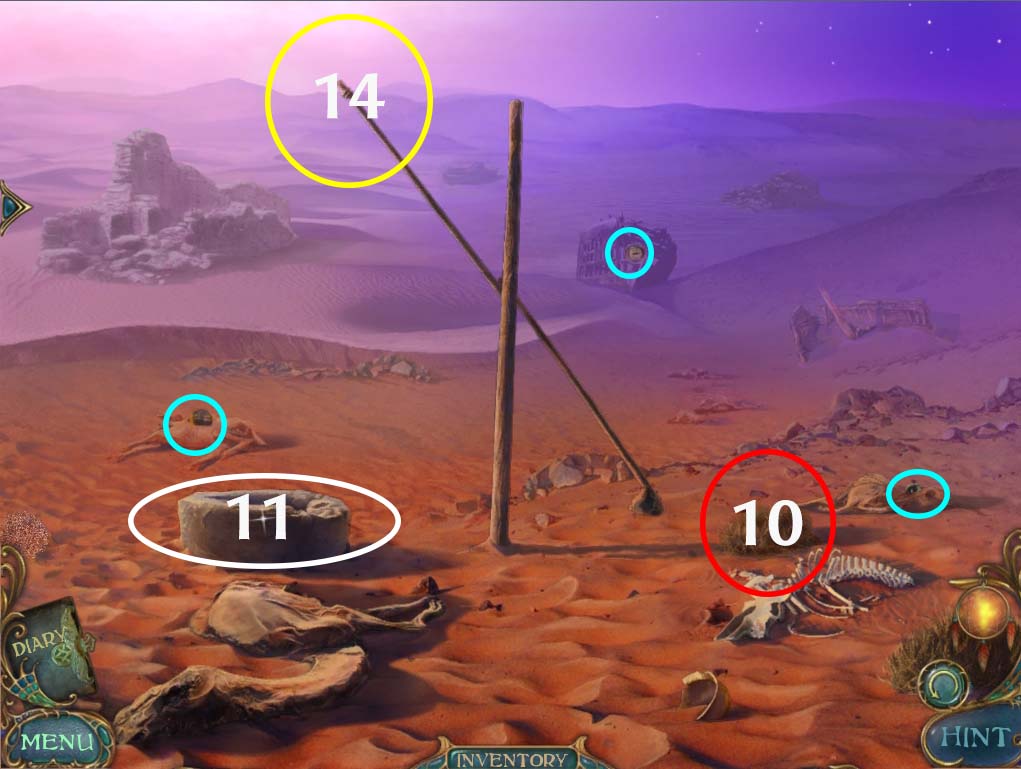
- Eliminate the BEHOLDERS in the area (circled in blue above) (3 of 3) / (105 of 110)
- 10. Investigate the SMALL BUSH circled in red in the image above. You’ll find a small twig with SEEDS there. Take it for your inventory.
- 11. Check the WELL (circled in white on the image above).
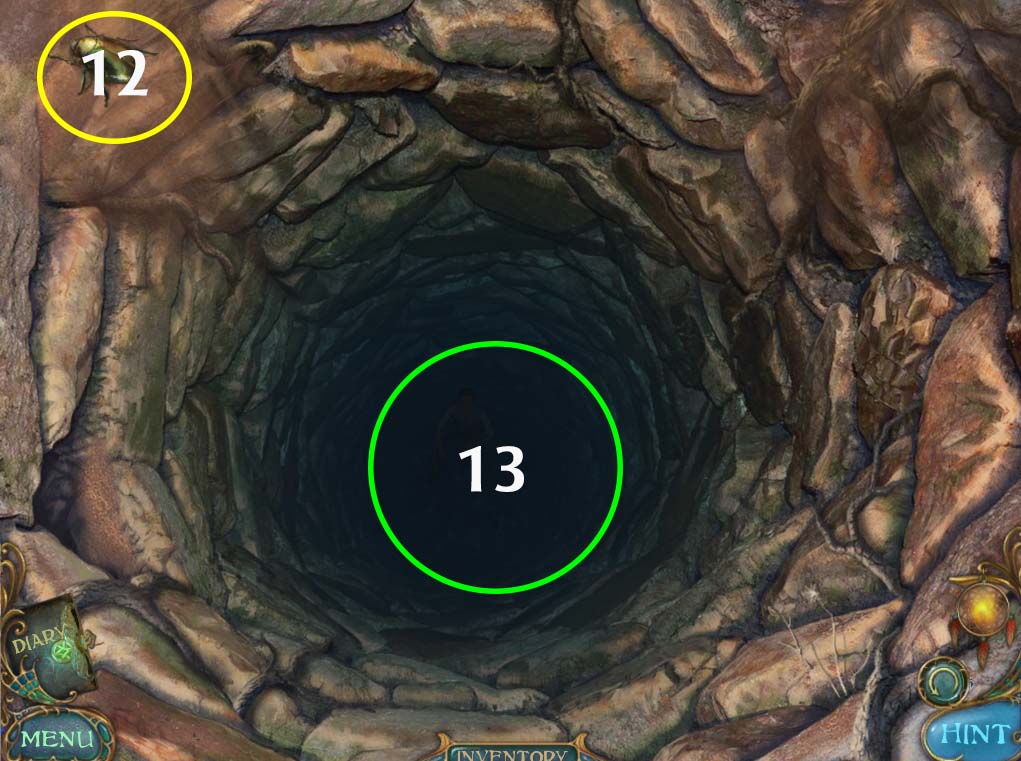
- 12. Take the BEETLE (3 of 4) (circled in yellow above) for your inventory.
- 13. It seems that someone is trapped down there, but it’s too dark to see who. Drop the GLOW STICK to give the person some light.
- 14. It’s TIMMY! And he’s trapped inside the well! Check the POST (circled in yellow in WELL image above) and attach the ROPE from your inventory. Click it to pull TIMMY out. Once he’s been rescued speak to him. He’ll disappear and leave behind a SHOVEL and another piece of the dreamcatcher. Take them both.
- 15. Return to the area of the ABANDONED HOUSE and check the door (circled in red on the ABANDONED HOUSE image above).
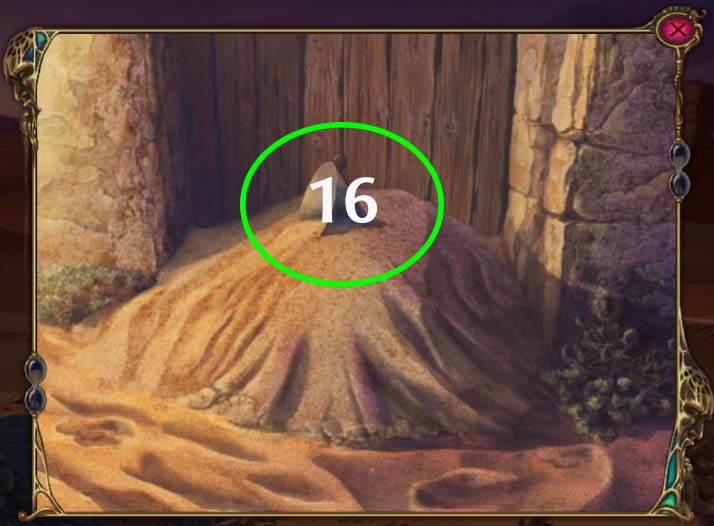
- 16. Take the FUNNEL (circled in green above) and then use the SHOVEL to remove the sand that’s preventing you from getting inside the house. Once the doors are open, step in.
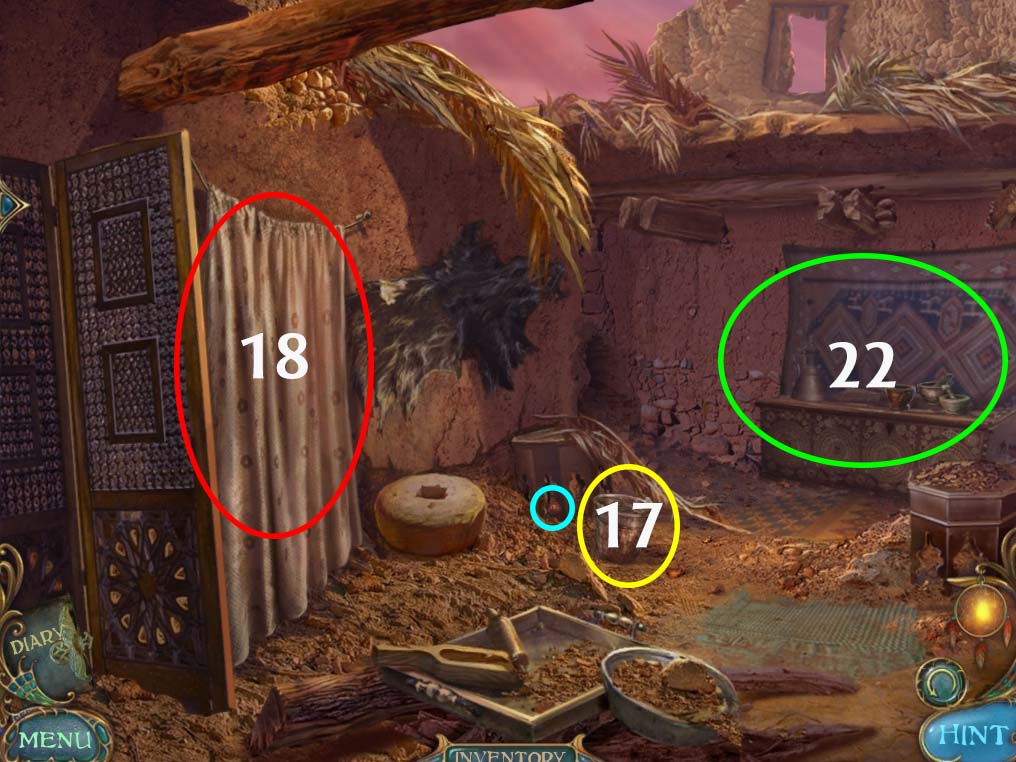
- Eliminate the BEHOLDER in the area (circled in blue above) (1 of 2) / (106 of 110)
- 17. Take the BUCKET (circled in yellow above)
- 18. Investigate behind the curtain (circled in red above) to reveal a poster.
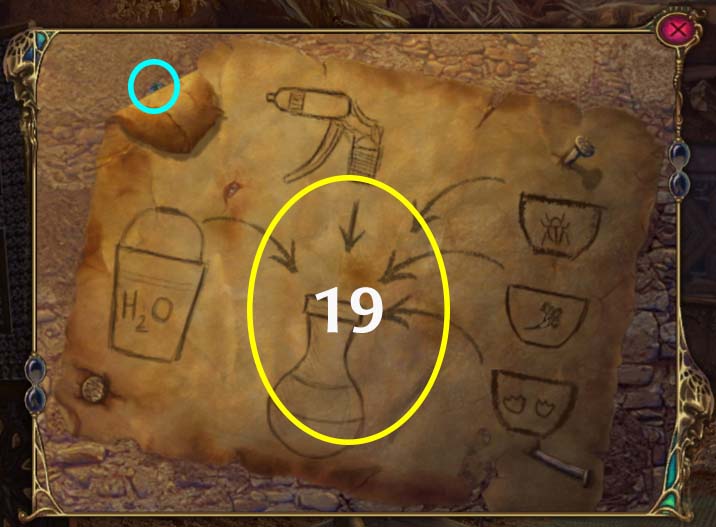
- Eliminate the BEHOLDER in the area (circled in blue above) (2 of 2) / (107 of 110)
- 19. The poster shows instructions on how to create an anti-snake potion. We have most of the materials already! Click the area circled in yellow above twice to reveal a DETONATOR HANDLE and the last BEETLE (4 of 4).
- 20. Head back to the DESERT area and check on Laura.
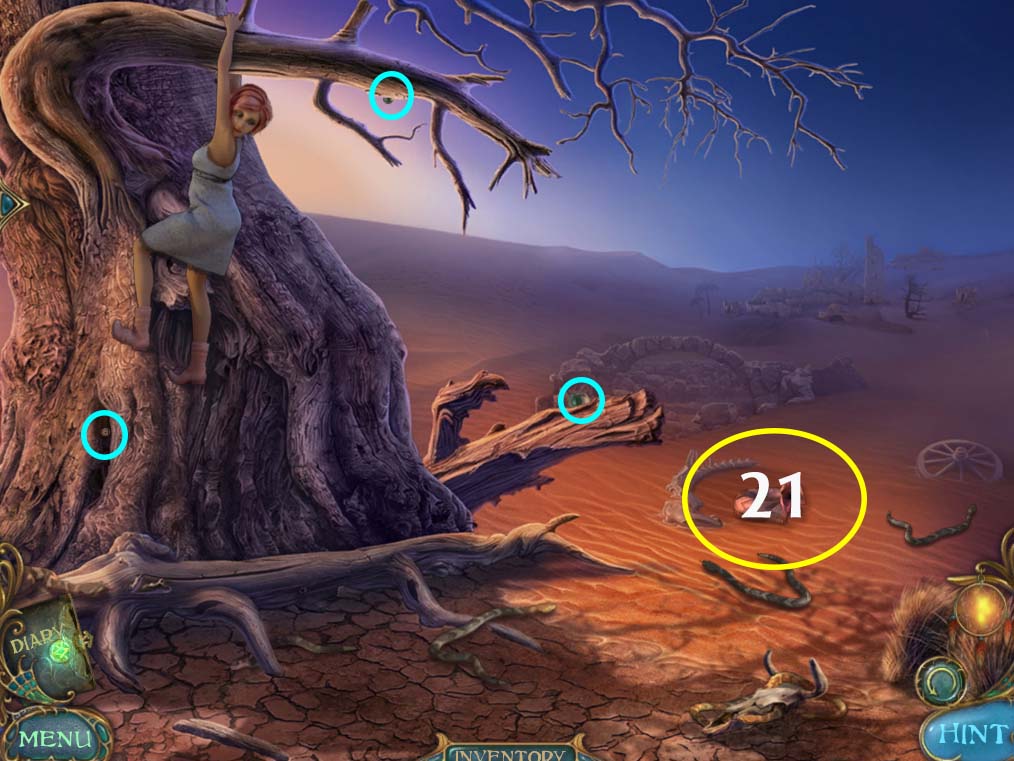
- Eliminate the Last of the BEHOLDERS (circled in blue above) (3 of 3) / (110 of 110)
- 21. Check on the snake circled in yellow in the image above. There should be some EGGSHELLS just below it. Take them for your inventory. Return to the WELL area and put the BUCKET on the ROPE to grab some WATER then head back inside the ABANDONED HOUSE.
- 22. Investigate the ALCHEMY TABLE (circled in green in the HOUSE INTERIOR image above) to start the POTION MINI PUZZLE
- POTION MINI PUZZLE
- The object of this simple puzzle is to brew the ANTI-SNAKE POTION. Grab the BLUE CRAYON (circled in green below) and place the FLASK from your inventory as shown in the image below. Place the FUNNEL on top of the flask and then pour in some WATER. The ingredients for the potion are clearly marked at the bottom of each mortar. After you place the SEEDS, the BEETLES and the EGGSHELLS in the respective containers, they should automatically be placed inside the flask.
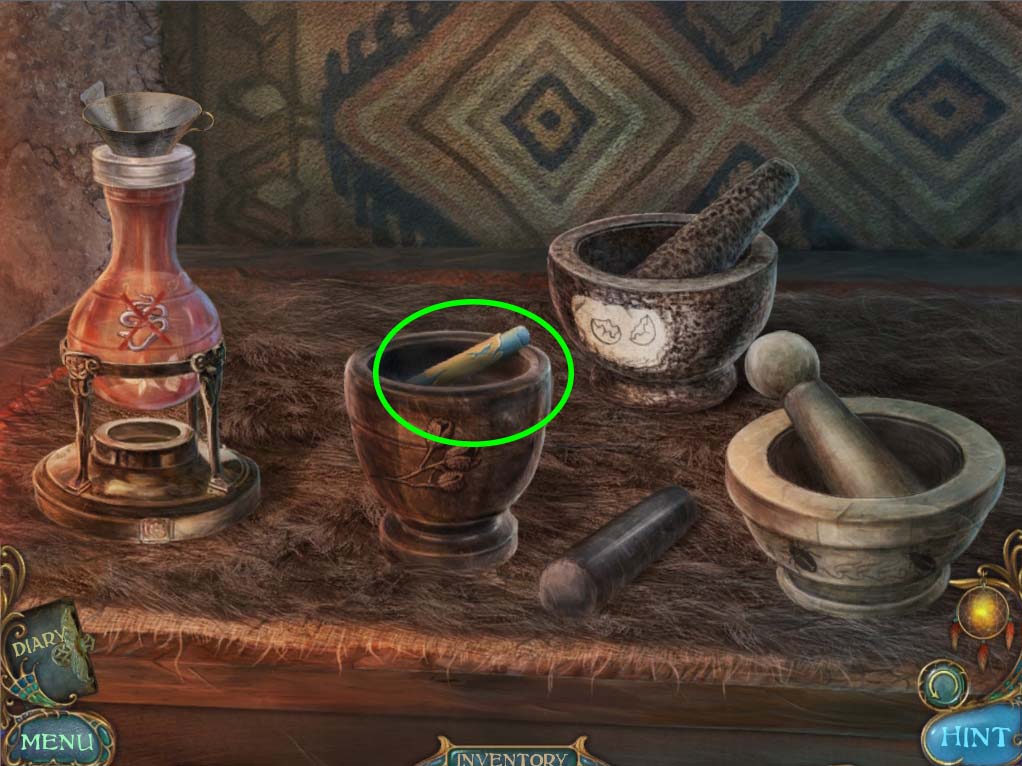
- With the potion mixed, take the SPRAYER from your inventory and put it on top of the flask. Take the now completed ANTI-SNAKE POTION and head back to Laura.
- Spray the ANTI SNAKE POTION at the snake which was near the EGGSHELLS earlier. This will drive the snakes away and allow Laura to climb down the tree. She’ll ask for WATER (take it from your inventory) and will thank you for your help. She’ll also tell you that the SANDMAN has already started his ritual to take Laura’s body! We need to hurry and stop him. Take the dreamcatcher piece that Laura leaves behind, and you’ll find yourself back in the HALLWAY.
End of Chapter VIII
Chapter One: The Professor’s Laboratory
Chapter Two: The Ruined Church
Chapter Three: The Frozen Lake
Chapter Four: The Family Home
Chapter Five: The Corrupted Forest
Chapter Six: The Abandoned Theme Park
Chapter Seven: The Empty Square
Chapter Eight: The Endless Desert
Chapter Nine: The Ritual
Ask for help in the comments below!
