Ella's Hope
This comprehensive guide is an Ella's Hope Walkthrough that takes you from Angel's Gate to the The Clouds of Estis. Side quests and extras are covered and there are many helpful maps and visuals as well.
General Information:
In this game you will play as Ella, or if you would rather to think of it in another way, Ella will always be part of your team. The walkthrough is written as if you are Ella though. Movement is made with either the keyboard arrows or mouse or a combination of the two (my fave). If your mouse or screen size is not working properly, be sure you have the most recent version where these have been fixed. The game author also frequents the forums at her website, www.eridani.com, so if you have any operating problems, you can ask a question there.
If you want to go into a windowed mode or back to full screen, you can use alt+enter or F12. If you wish to turn off the game sound, hitting F1 will bring up a screen that allows you to uncheck the two play sounds boxes.. The game interface uses a combination of the esc key, space bar, and enter key for the keyboard. On the mouse, the left button acts as the space bar and the right button acts as the escape button.
The game is scored at the end of the game. You will not see your running score during the game. Your score will be a combination of quest points (out of 330 at last count), finding sky orbs (I believe only 49 have been found so far), and final exam score (out of 20). The final score is out of 50 points.
At the beginning of the game you are given the option of choosing your difficulty level. If you have not played this type of game before, you should really play it on the easy mode. If you don't like fighting, then choose the story mode. However, the fighting is just challenging enough on easy mode to make the game enjoyable without getting too frustrating.
In addition to progressing through the game, fighting is also important to get gold and experience. You will need gold to buy different potions and armament to assist in your fighting. You will need experience levels to become strong enough to fight effectively.
Sidequests are a very important component of your score. You need to talk to everyone if you want to find sidequests, and you need to talk to them more than once since sometimes once thing needs to be done first before a character will initiate a sidequest. Always choose to be helpful and nice as that will provide you with quest points and/or bonuses later on. Somestiems a quest is team member dependent and you will want to talk to some people with a different set of team members.
You can change your team by pressing A from the main play screen.
Bonus items are found in chests, barrels, drawers, and such. Sky orbs are frequently found tucked behind a tree or in a tiny cave. If you can't get into a small spot, you will have the chance to do so when you have Areth the fairy with you. Some chests will be locked initially but eventually you will get the skill to unlock those chests and the opportunity to return to do so.
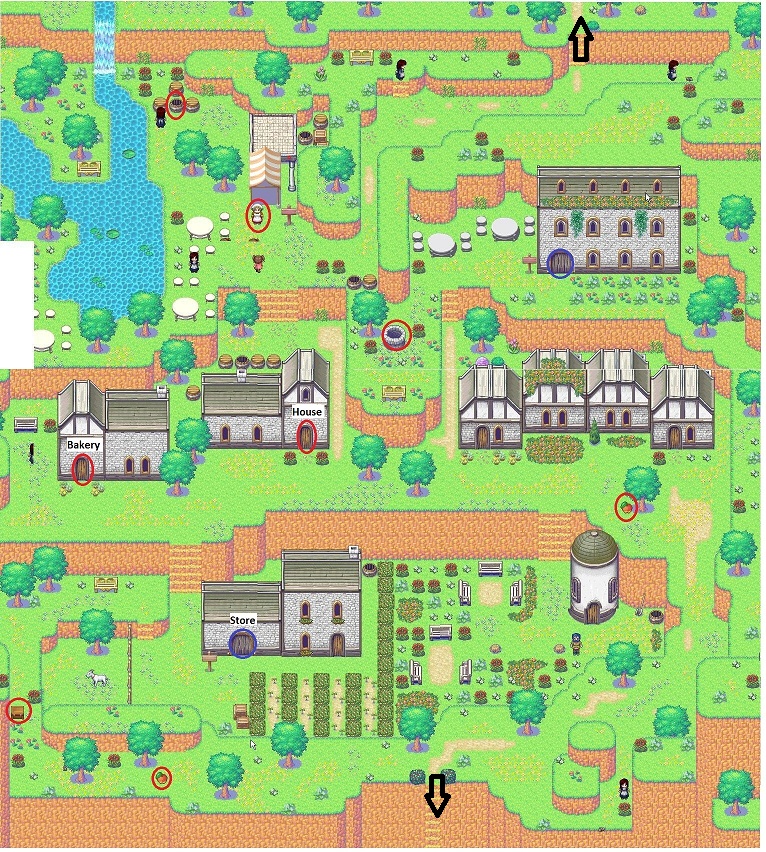
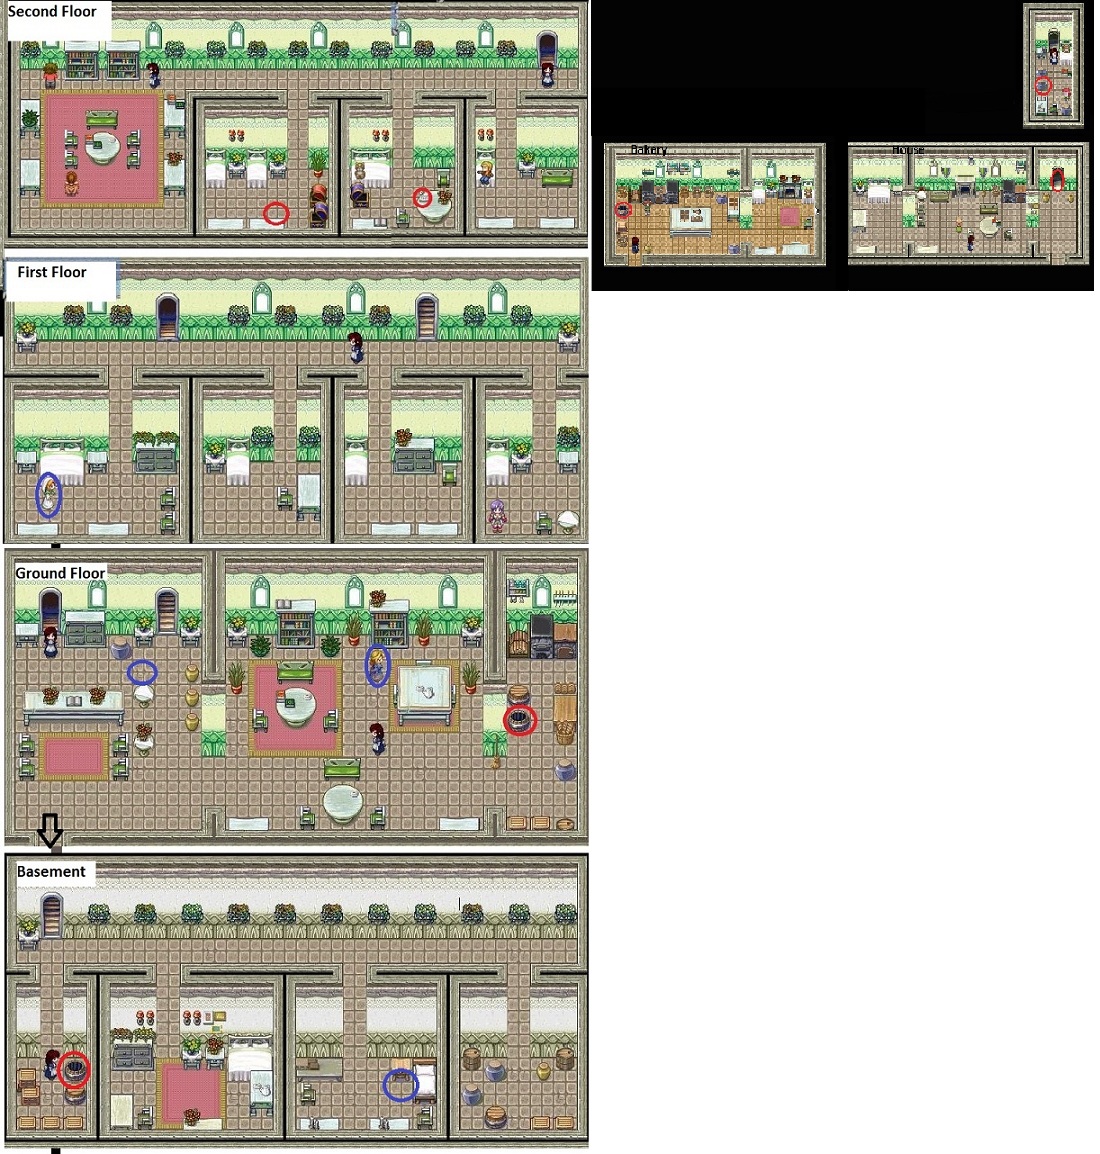
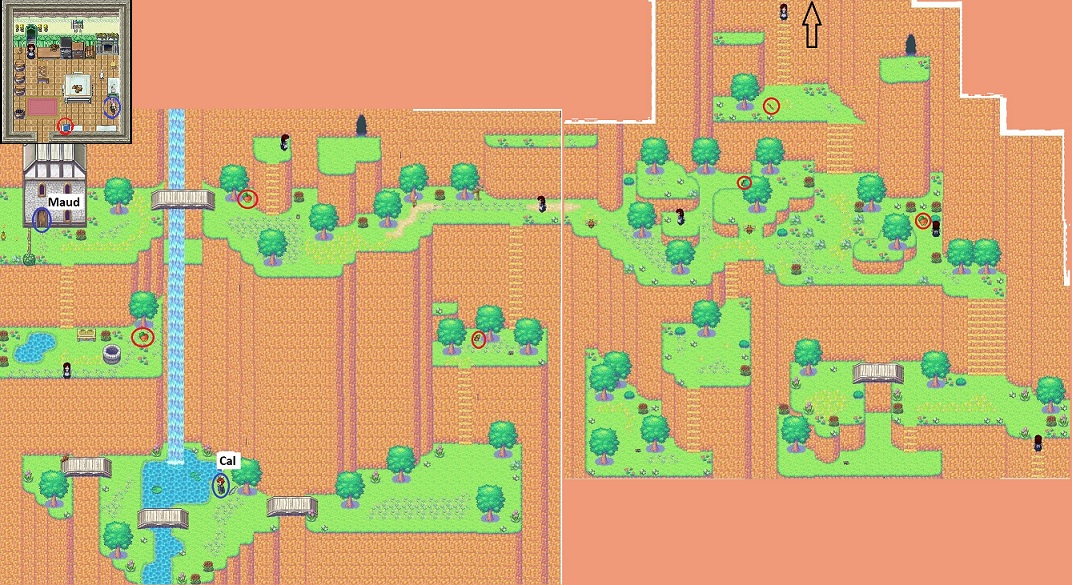
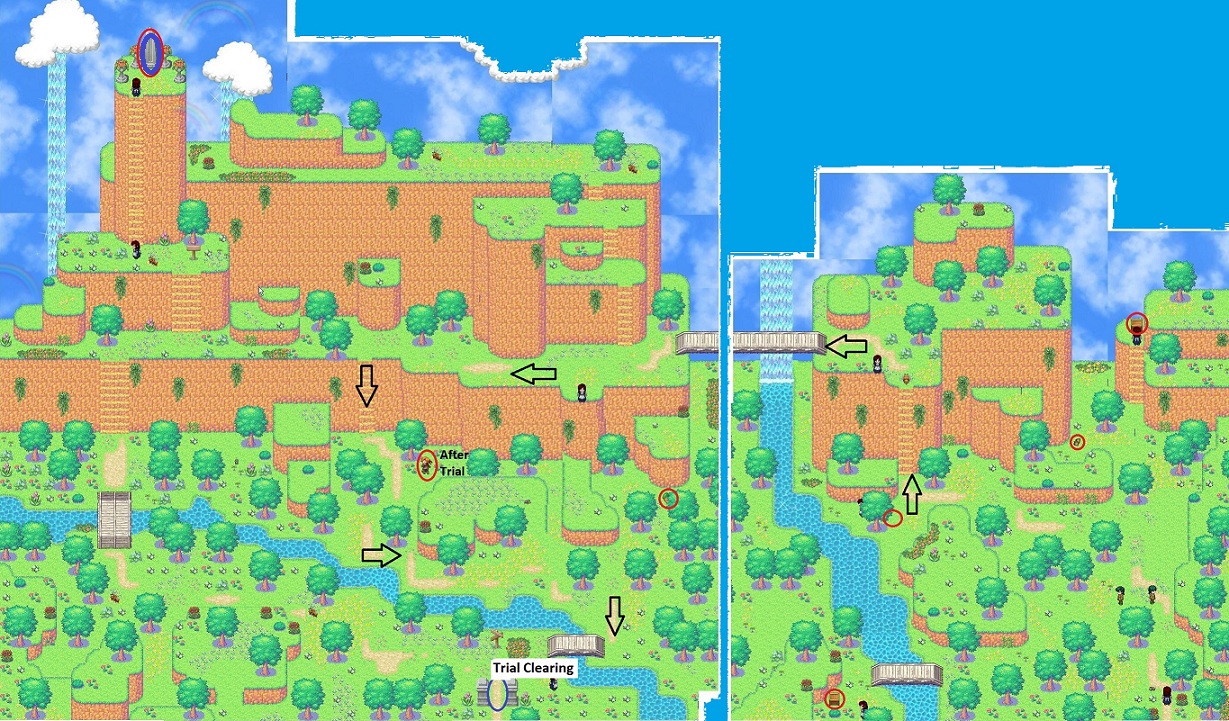
The walkthrough is split up into the Main Quest and Sidequests and Extras. Just click on the link. Screenshot maps are included in the Main Quest section. Items circled in blue are necessary for the main quest. Items circled in red are either sidequest items, bonuses, or sky orbs. If an interior of a building is not shown, it means that there is nothing to do in there or that it is very obvious what to do inside. I have circled any doors that require entry though. I would still go in each building if possible and talk to everyone but at least you don't have to waste your time clicking on every single items. Items circled in purple will be available to explore at a later time upon your return back. (You will return to Draygor Castle and the Snow Fields a second time.
Hints for fighting:
- You will choose between Attack, Skill, Defend, and Item. If you choose an attack or skill that only affects one enemy you will also need to select the enemy to hit. If you choose a skill or item that will affect only one team member you will need to choose the team member including that particular person.
- Enemies become stronger and strong as the game progresses, but so do you as long as you gain experience.
- Fight everything you come across in the beginning to increase your experience level.
- If you lose a battle, you will get a Game Over screen, but you will be able to go back to an Auto Save point or your own save point.
- Save before a big battle because sometimes the Auto Save point is a bit further back than you might want to replay.
- There is no published table (so far) that explains each enemy's attack method and weaknesses. The programmer published a strategy guide, but it did not give many specifics regarding how to fight. I ended up forgetting to even look at those.
- As you are fighting, pay attention to what happens to your enemies as each character metes out damage. Take note of which spells are most effective against each type of enemy and then use them.
- Try different approaches until you find something that works. I probably overused the spells, but it worked for me! I also like spells that hit all the characters at once, which was probably just lazy on my part.
- Sometimes direct attacks are more effective than using a spell.
- It is handy to stun, paralyze, put to sleep an enemy so that you can concentrate your firepower on just one enemy at a time. Also take that time to regenerate your party as necessary when your enemies are down. Personally I like using spells that hit all the characters at once.
- Also take note of the fact that sometimes your attack will actually give your enemy energy. White numbers are a decrease and green numbers are an increase.
- As the game progresses along, your characters will get more and more powerful spells. Always check out your new ones as they are frequently given to you just in time to be helpful.
- Some spells will "revive" a team member and some will "remove negative states." Revival is necessary when your team member has actually disappeared from the screen. You cannot use a revival potion unless your character is "exhausted."
- The spell that removes negative states is particularly helpful as you do not need to pick the right potion and it can remove more than one type of negative state at a time.
- You can also remove negative states by using the item choice and select the potion that will solve the problem. Note that you can use a weaker character to provide more health points (HP) or magic points (MP) to a character that is losing them but is a stronger fighter.
- One suggestion is to choose characters (once you get to do so) that that have the most MP available for use. I found the spells were just much more effective than raw power.
- Equipping your character with the right equipment can be very helpful. You should note that your weapon will frequently have an elemental attack. It is particularly important not to use an attack that will give your enemy an enemy boost.
- SP and MP are the same thing.
- Most enemies will disappear after you battle them but a few will regenerate each time you re-enter their area. Good news is that at least you will get more gold and experience when you fight them again.
- A lot of battles can be avoided by running past your enemy but don't do that until your experience has been built up.
- You will want to purchase enough potions and such to help you get through a fight or rejuvenate afterwards. Extremely helpful are nut tonic (50% HP and 50% MP), taiku essence (60% MP), and taiku drops (25 MP points) plus those that will revive your character from exhaustion. By the end you really should have about 30 or so to keep your team in fighting form.
- Save whenever you can before you get to a fight while you are figuring out your party's effective moves.
- Try to remember to unequip your team before you talk to the guardian to return home. That way if your team members change you will have all of the equipment available.
- I have yet to figure out exactly what all the information on the equip page means, which means you don't need to know it either to play. I just figured that if the equipment upped my numbers it was probably a good thing. I did pay attention to the elemental attacks because having for example an Ice attack on an icy level is basically useless because you will energize your enemies. Also Ella has a paralyzing attack on her basic weapon that may be more handy than something more powerful. The main thing to remember is that if you are not experienced at this type of battling to play easy or be prepared to save and play over while you pay attention to what each attack does to your enemy.
Angel's Gate
Main Quest
- Wake up and go upstairs to talk to your boss, Ernestine.
- Go to pick up a package at the Angel Gate Store.
- Return to Ernestine who wants you to deliver a letter to a guest upstairs.
- Deliver the letter to the Guardian and then you can go find Cal.
- Work your way to the south.
- Pick up the stick and equip it as your weapon.
- Talk to Cal at the Mountain Pool
- Wake up in room and go up to the main floor to pick up the basket blocking your way
- Go south to get eggs from Maud
- On your way up you will save the man from the monster.
- Guardian Heller will give you an admission scroll for the Trial.
- Finish looking around the South Mountains before you go to the Trial as you won't be able to return later.
- Go up to the Trial Clearing and enter the Guardian Trials.
- Chose one of the 4 trials below. Each one will give you different capabilities that you will then carry on through the rest of the game. Personally, I liked the Strong Conviction as Ice Bow and Needle Rain were useful later.
Strong Conviction - Ice Bow, Storm Pendant, learn Needle Rain. Fight Mesi, a water monster.
Free Spirit - Storm Bow, Storm Pendant, learn Cunning Breeze. Fight Haizea, an air monster.
Might and Force - Furnace Bow, Fire Pendant, learn Flame Point. Fight Saraf, a fire monster.
Caring Heart - Forest Bow, Earth Pendant, learn Rock Will. Fight Akamu, an earth monster.
- When you enter be sure to go to all 4 chests to get your weapons and spells. Equip your weapon before you approach your opponent. While fighting, select Skill and then the spell you learned. If you happen to lose, go fight some more bees to increase your experience. Also be sure to use your Item choice to renew your HP/MP if need be.
- Upon finishing, choose to argue with the Guardian. After finishing up, go to the Angel Stone.
Side Quests and Extras
-Find the Witching History Book
-Throw gold in the well
-Find a stick and equip it.
-Find a Peasant Hat
-Receive a ring
-Read memoirs of an Adventurer
Get more information.
- Get the Witching History Book from inside Maud's house on a table-- to be continued in The Good Witch.
- Don't wake the sleeping boy; talk to him after the Trials to receive a ring.
- On the top floor of the inn, read Memoires of an Adventurer.
- Touching the Angel Stone before the trial will give you 5 H P


